We will guide you through everything you need to know on how to use Cherrydeck’s Content Library when working on different client projects.
In this guide, we cover:
- Accessing Projects
- Accepting Jobs
- Entering shipping information
- Uploading photos and videos
- Tagging photos with or without models
- Selecting video types
- Uploading contracts
- Sharing your Galleries
- Review client’s comments
- Check purchased assets
Get Started
1. Access Projects section
From our Jobs & Opportunities page, you are able to apply to our different clients’ projects.
If you were successfully selected for a project, you’ll find the Projects section on the menu tab (top right of your window) from your Cherrydeck profile.
Welcome to your Projects! They are sorted from newest to oldest.

2. Accept the job
When you get assigned to a project, you’ll be notified via email as well.
Carefully take a look at the briefing and see if the timing (i.e deadline) and requirements fit your schedule and availability.
Accept the job by clicking on ‘Accept Work‘ or decline accordingly.
Declining a project won’t affect your eligibility for future projects. We prefer a decline over neglected work!

If you have missed the expiration date of a project invite, you will see a window like below when trying to access a project:

3. Enter shipping information
Once you have accepted the job, you will be asked to provide your shipping information to receive the products for the shooting.
You must complete this step within 24 hours to proceed with the job.

Project To-Do’s
You can start shooting as soon as you receive the products!
Remember that the more you follow the client’s brief, the more your photos and/or videos are likely to be purchased.
Note that some clients require their products to be sent back, therefore, be careful with handling!
4. Upload photos and videos
When you have all the content ready, you should upload it into a Gallery on Project’s workspace.
You can proceed to upload the content by clicking on the ‘Upload new photos and videos‘ block, as seen below.
Please note: To complete your upload later on, you must submit the seller agreement and/or model release accordingly, make sure to avoid time conflicts and have them ready before the project’s deadline.

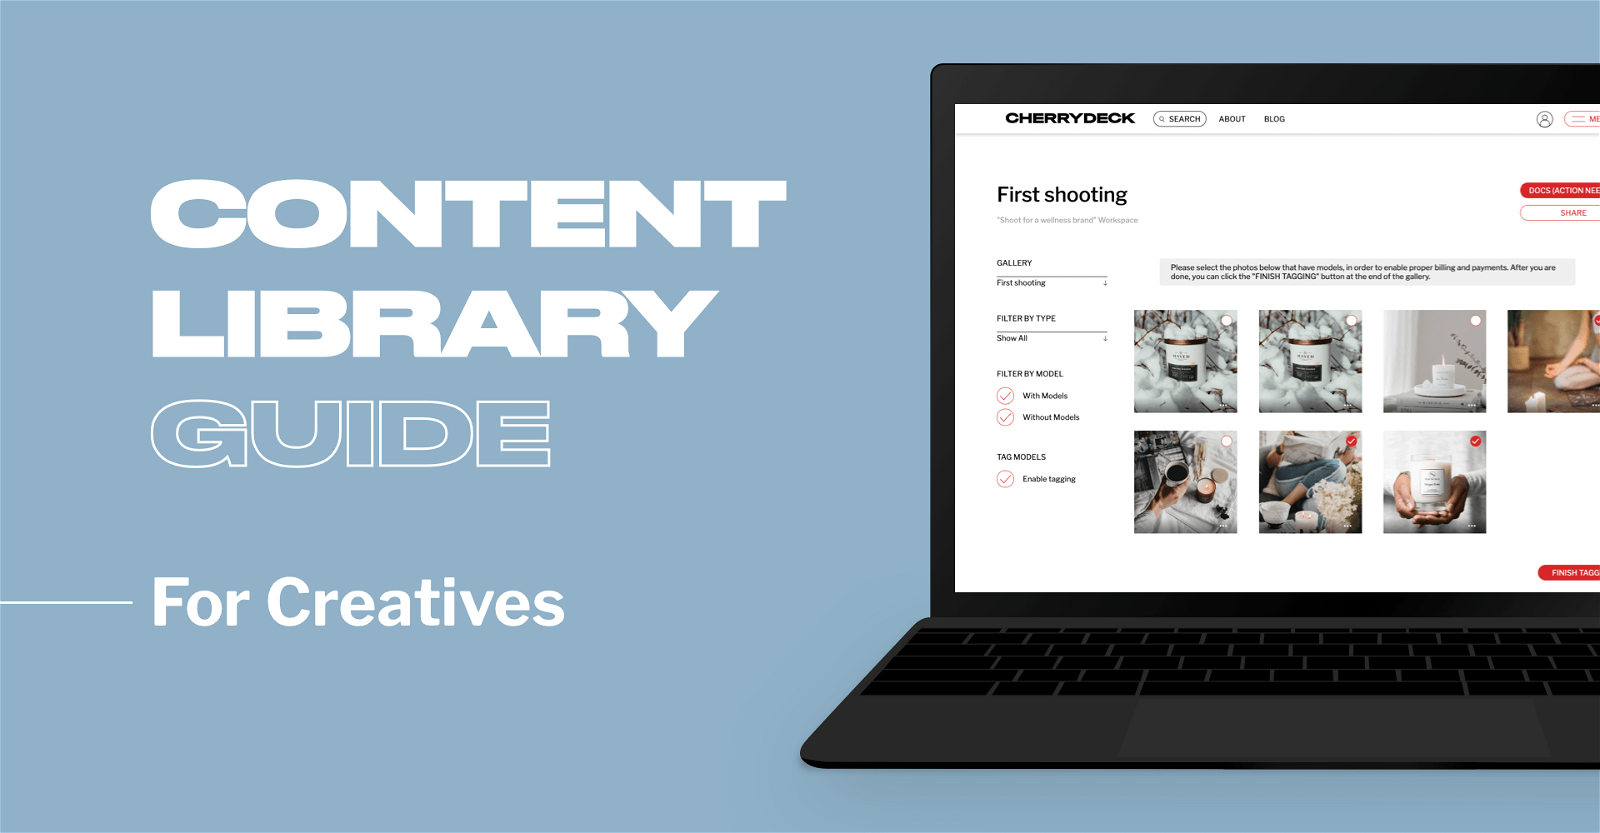
5. Tag your photos
As soon as you upload your photos, you must tag photos featuring models.
This will not only allow your payments to be processed accordingly but also allow the client to filter images properly. Therefore, make sure you correctly tag your photos.
Click on the ‘Finish Tagging‘ button to save your selection.

6. Select video types
When uploading videos, you should choose the type of video content you are uploading. This way, your payments can be processed correctly.
Select the video type accordingly and finish uploading by clicking on the ‘Upload‘ button.

7. Upload contracts
To move forward and share the photos and videos with the client, you must upload the seller agreement and/or model release (if applicable).
You can download the templates directly from the platform. Fill and sign them, and then upload them to this section.

8. Share Galleries
Review your galleries before sharing. Then, select the galleries you want to share and click on the ‘Share‘ button.

After uploading
9. Review client’s comments
Once you’ve shared your galleries with the client, they will review them and give feedback where needed.
If you have received comments, you will receive email notifications accordingly. The system will also show you an update when opening your Workspace.
You can filter out the content that contains comments, and view them by clicking on the ‘Comment’ icon

Once you open the comments view, they will be marked as read automatically.

10. Check purchased items
To ensure transparency, you are able to see which assets from your uploads were bought by the client. To do so, simply click ‘Purchased Content’ on the Filter by Purchases section on the left side bar.

This is the end of the Content Library Guide for creatives. If you are having trouble using the content library, kindly contact us.